Quick Start Guide
The CLARIAH Media Suite is the central digital access point for AV collections and search and analysis tools in the Netherlands for students and researchers. It is part of the Dutch Infrastructure for Digital Humanities and Social Science developed in the CLARIAH project. The full version of the Media Suite is accessible to researchers and students from Dutch universities, higher education institutions and a select number of Dutch research institutions.
The purpose of this quick guide is to get started with exploring the Media Suite’s collections and to familiarise yourself with the environment’s possibilities and tools. The guide introduces you to the environment’s basic features. For more in-depth information on each tool and their uses in different teaching and research contexts, you may visit the links embedded in this guide. It is also highly recommended to visit the Media Suite Learn resource where a number of subject and tool tutorials, as well as example projects are made available.
Preparation
Login Before you can explore the different collections and begin using the Media Suite, you first need to log in . To do so, you click the ‘Login’ button at the top right of the page. You log in using your university credentials, meaning you do not need to create a login separately for the Media Suite.
Creating a user project After you have logged in, it is recommended to first create a user project in the Workspace . This will make it possible for you to save items and queries during your sessions. To do so, click on ‘create a user project’ in the dropdown menu under ‘Workspace’, and fill in a title and a description. Having created a user project it will, in the subsequent stages of your exploration, be possible to click on ‘ save query ’ when you want to store a search query, including your search terms and also any selected search facets. You can also store individual items by clicking on ‘ bookmark ’. Both the items and the queries will be stored in your user project in the Workspace, ready for you to return to at a later time.
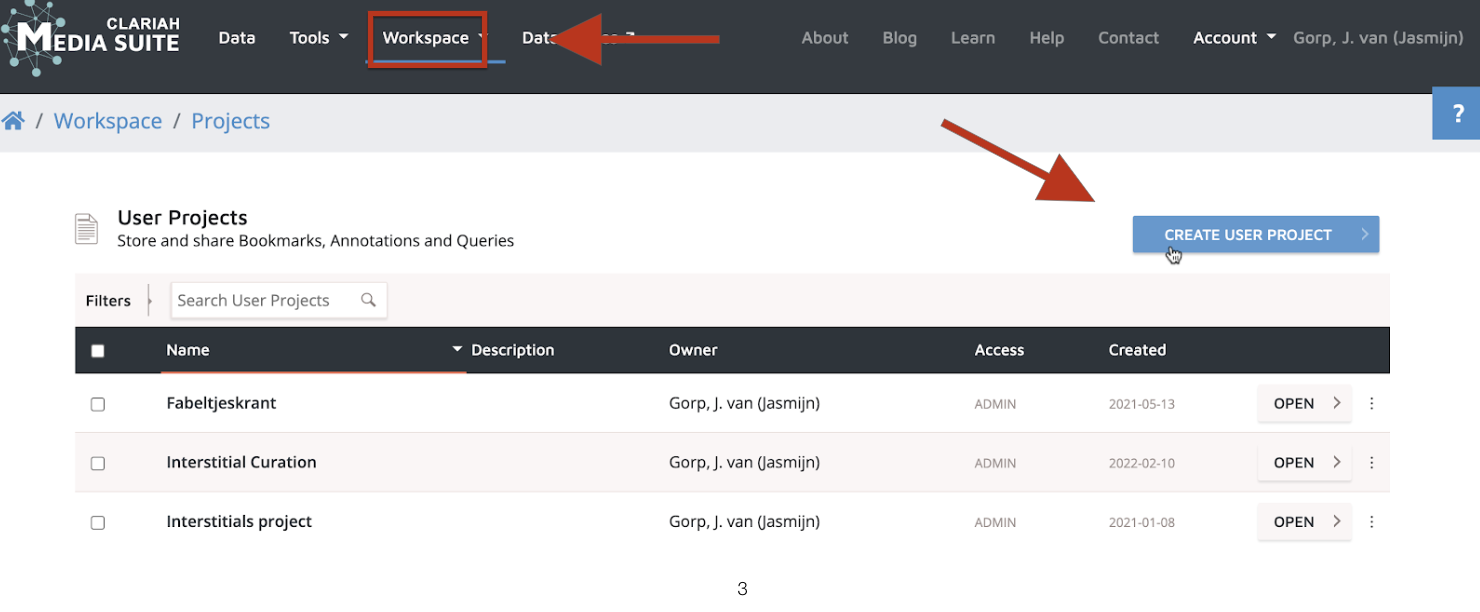
Figure 1. It is recommended to create a user project. This will allow you to retrace your steps and go back to saved queries and objects at a later time.
Tools You are now prepared to start your exploration of the Media Suite. The different tools offered are all designed with the aim to support scholars in the main steps of their research process. If you visit ‘ Tools ’ at the top of the page, the drop-down menu will let you select four different environments:
-
Search : Choosing this option, allows you to begin searching the collections available in the Media Suite and use different facets to define your query. We recommend starting with this tool if you are learning to work with the Media Suite, or when you have a specific search query in mind. Please note that the metadata differs per collection and that you can only search one collection at a time. This means that you need to adjust your search behaviour per collection. While you cannot search all collections at the same time, you can however bookmark as many items from all the different collections for your user project as you like.
-
Inspect : With this tool you can inspect metadata fields for each collection, and check how complete these data fields are over time. This tool is primarily helpful for data critical inspection of the collections.
-
Compare : Using this tool, you can compare multiple of your saved queries with each other, after you have stored them in your user project. Comparing your queries helps you gain insight into the collections, further define your search terms or analyse the occurrence of specific topics over time.
-
Explore : Explore allows you to browse a subset of collections from different Dutch cultural heritage institutions in a serendipitous fashion. It works independently from the Media Suite’s Search tool and is the only tool not fully integrated in the Media Suite. Explore is suitable when you do not have a specific query in mind, but are interested in open exploration.
Searching
Search environment
To enter the search environment, you go to ‘Tools’ and select ‘Search’. You can thereafter click on ‘
select collection
’ to define where you want to search. For more information on each collection, click on ‘
Dataset description
’. After selecting your collection, the number on the right will show you the total number of items it contains.
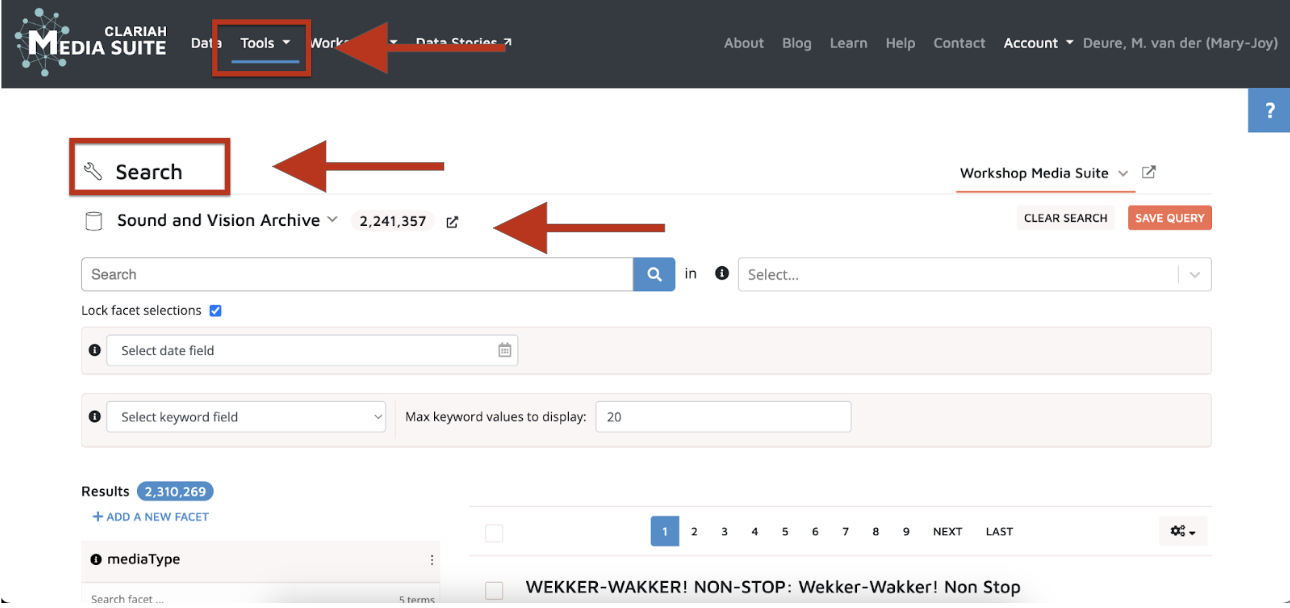
Figure 2. In the Search tool, you can select different collections and see how many items it contains.
Search queries To search in a collection, you can enter keywords in the search bar. When doing this on its own, you will search all metadata in this collection for that keyword. Metadata consists of all information describing an object in the collection, such as broadcaster, description, date etc. If you want to search in particular parts of the collection, you click on the dropdown menu to the right of the search bar and select which data layer you want to search. The data layers available will vary per collection, but it can contain options such as titles, descriptions or, in the case of the Sound and Vision archive, data enrichments such as Automatic Speech Transcripts . In this latter case, it is important to know that not all of the digitised items in Sound and Vision’s collection have received speech transcripts, as this is an on-going process. This layer thus only allows for searching in a select part of the collection.
Search facets You can further elaborate on your search query by selecting facets . These are filters, based on existing metadata that you can use to narrow down and target your search results. The facets can be found on the left side of the screen. There are many options and it is recommended to explore some of these possibilities on your own. As with other data fields, also the facets will vary per collection. One way to narrow down your search results, for instance, is to select the media type you are interested in. If you are, for example, interested in television materials it is recommended to select ‘video’ in the mediaType facet. Subsequently, you may click on ‘ Lock facet selections ’ to ensure this facet remains selected if you search for other keywords. For more information and guidance on searching and search facets in the Media Suite, you may consult the following case-based tutorial .
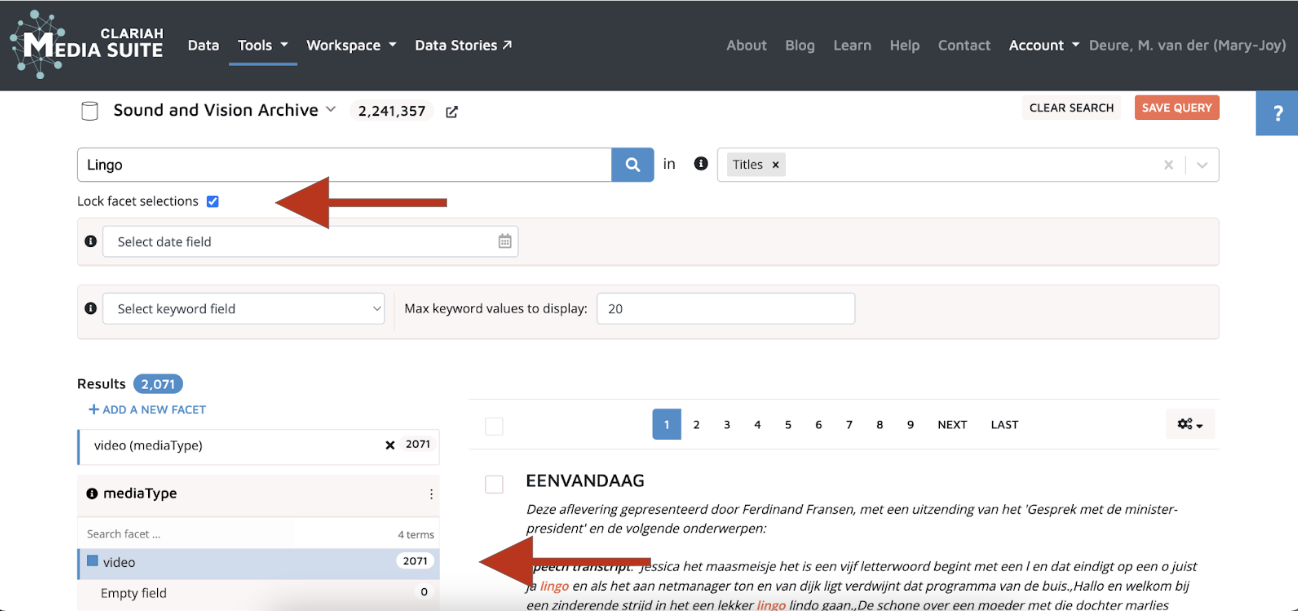
Figure 3. To define the medium you want to search for, select a media type and lock the facet selection.
Refining your search
After your initial exploration, you can further refine your search query . While the Media Suite offers many ways to do so, this quick overview will discuss some of the most frequently used approaches for the largest collections in the Media Suite. While this overview does not discuss all the collections, it offers you a sense of how different collections make use of different date fields and how, as a consequence, it is necessary to adjust search behaviour from collection to collection.
Date To gain insight into the dates of your search results when searching in collections from the Netherlands Institute for Sound and Vision, you can click on the drop-down menu ‘Select date field’ and select ‘Date, sorting (PREFERRED)’ . This is the closest equivalent for broadcasting date in NISV’s metadata. Without further determining any dates, you can click on ‘Show chart’ to create a visualisation . This provides you with an overview of your results, categorised by year. Above the visualisation, you can also select a start and end date, to search in a specific time period. Additionally, you can adjust the visualisation from ‘ Absolute ’ (the actual quantity of objects) to ‘ Relative ’ (in percentages, calculated by dividing the number of retrieved objects by the total number of objects that year). You can interact with this visualisation and go to the results per year by clicking on the bar chart.
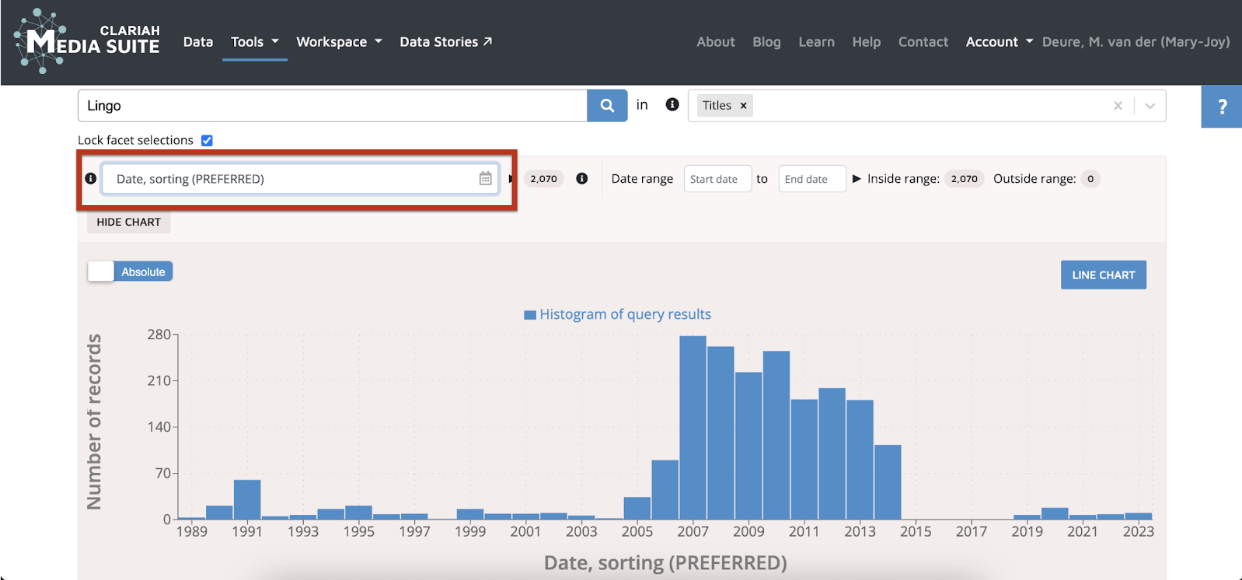
Figure 4. To create a visual overview of the results for each year, select ‘Date, sorting (PREFERRED)’ in the Sound and Vision collection.
Keyword fields You can also further refine your search by exploring and visualising other metadata. The options are dependent on the collection you are searching in, so it is recommended to explore this on your own. Examples of this are:
- Genre : This is an option in the Sound and Vision collection and will visualise the different genres as they are determined by the institution. To do so, click on ‘Select keyword field’ and select ‘Genre-museum-series’. This will provide you with a visualisation of the different genres.
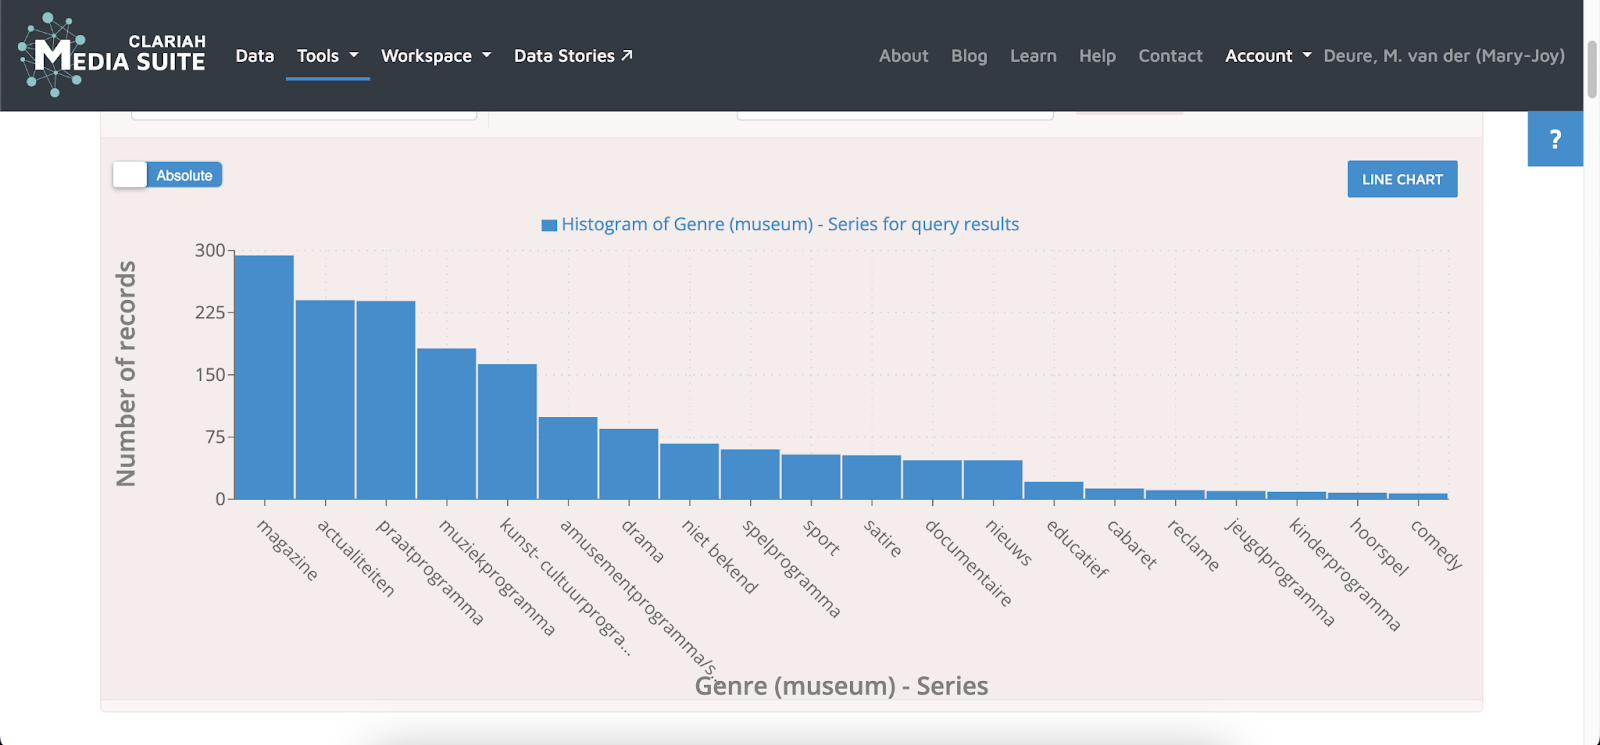
Figure 5. To create a visual overview of the genres for each year, select ‘Genre (museum) - Series’ in the Sound and Vision collection.
- Subject : In the Open Images - EYE collection, you can visualise metadata to get an indication of the different subjects present in the collection. For this, you need to go to ‘Select keyword field’ and go to ‘Subject *’.
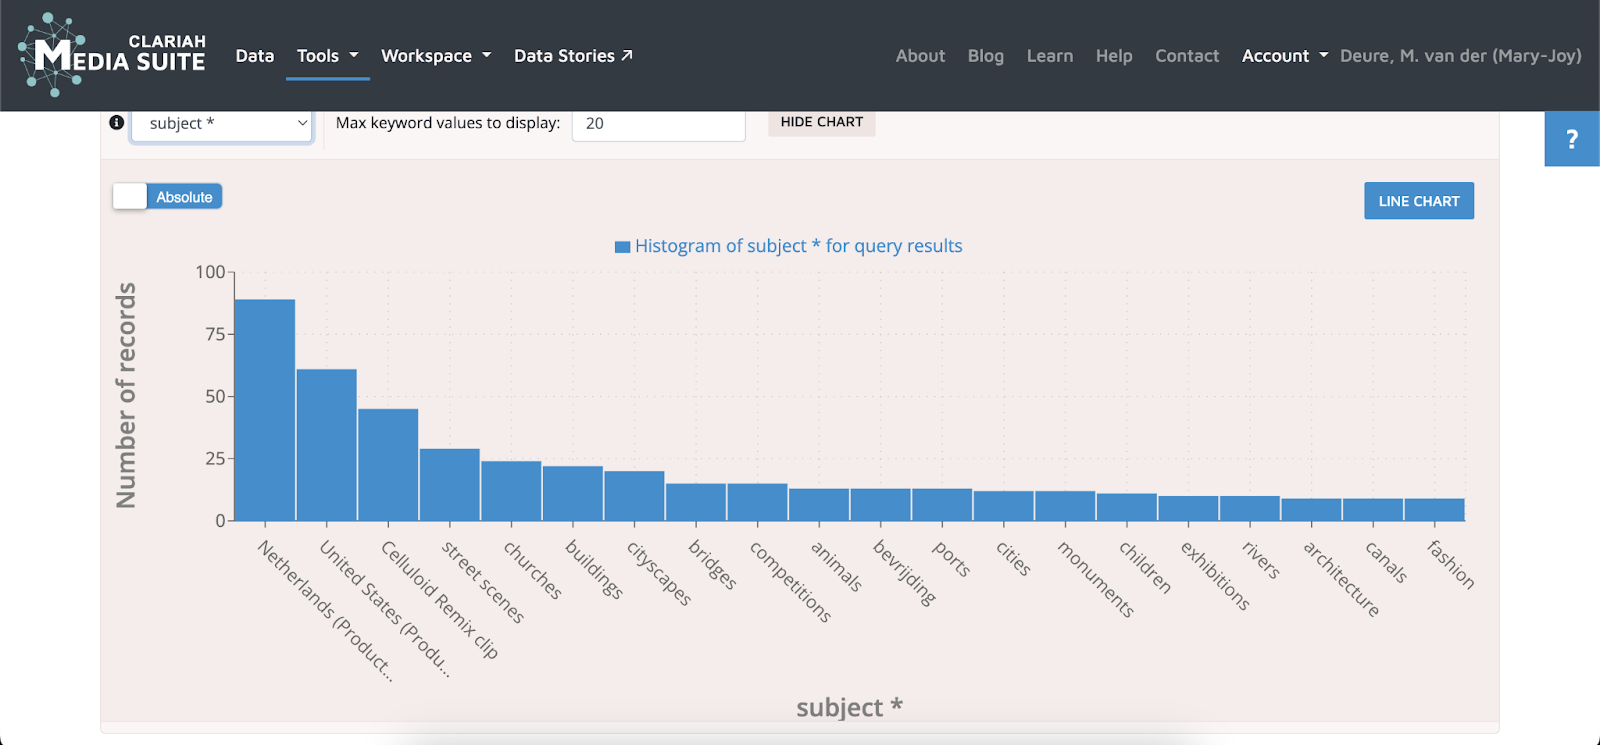
Figure 6. To create a visual overview of the subjects present, select ‘Subject*’ in the Open Images - EYE collection.
-
Boolean queries: To further define your query through ‘search expressions’, you may also use so-called Boolean operators. With these types of queries, you can elaborate how you want your keywords to relate to each other. The Boolean operators supported are:
-
OR : This connects two or more similar concepts (often synonyms). It means that either one of the search terms needs to be present in the metadata, and will thus broaden your search. For example: Koningin OR Majesteit.
-
AND : This demands that both search terms are present in the metadata of the object, and thus narrows down your results. For example: Koningin AND Beatrix.
-
NOT : This ensures one keyword is ignored in combination with the first. This also narrows down your results. For example: Koningin NOT Juliana.
-
Double quotation marks : This will demand that the search words are both present, and well as in the same identical order. For example: “De Wereld Draait Door”.
-
Asterisk : This also widens your search by allowing all word variations after the asterisk. For example: Boeren* will ensure that you also search for words such as: Boerenleven or Boerenmarkt.
-
Question mark : This also widens your search, but only allows one character difference after the query. For example: Nieuw? will also allow for the variation of Nieuws
-
Saving queries It is possible to save your search queries at any time. This includes all refinements mentioned so far above. To do so, simply click on the ‘ Save query ’ button to the right of the selected collection. This will allow you to select the User project in which you want to save the query, and name it as you please. You can now go back to this query at any time to continue your search or perhaps compare the results to those of a different query.
Close reading
Once you have found an object you want to analyse further, you can click on the title to enter the ‘Resource Viewer’. Here you can play the objects ( when available ), further explore their metadata and annotate.
Play and save a resource On the left of the screen, you can view or listen to the selected object. To store the object in your user project, you can click on ‘ Bookmark ’. This button can be found on the right side of the screen, in line with the object title. Under the object, you can find a timeline in which you can scroll through the video or audio.
Explore the metadata In the middle of the screen, next to the object, you will find the metadata block , which contains two tabs.
-
In the first tab, you will find a quick overview of the most relevant metadata, such as title, description and date. If available, this will also provide an overview of the people (discussed) in the object, through what is called ‘ linked data ’. If you scroll all the way down in this block, you will see ‘Full metadata’ which will open up a new window that provides access to all the related metadata.
-
In the second tab called ’ Content annotation ’ you will find any available enrichments to the data, such as news segments or the transcripts processed by the Automatic Speech Recognition . When such enrichments are available, you can select the desired enrichment through the drop-down menu in the ‘Content annotation’ tab. The enrichments are interactive, meaning you can click on a specific segment to skip to that part of the video. These enrichments are also visible in the timeline underneath the video.
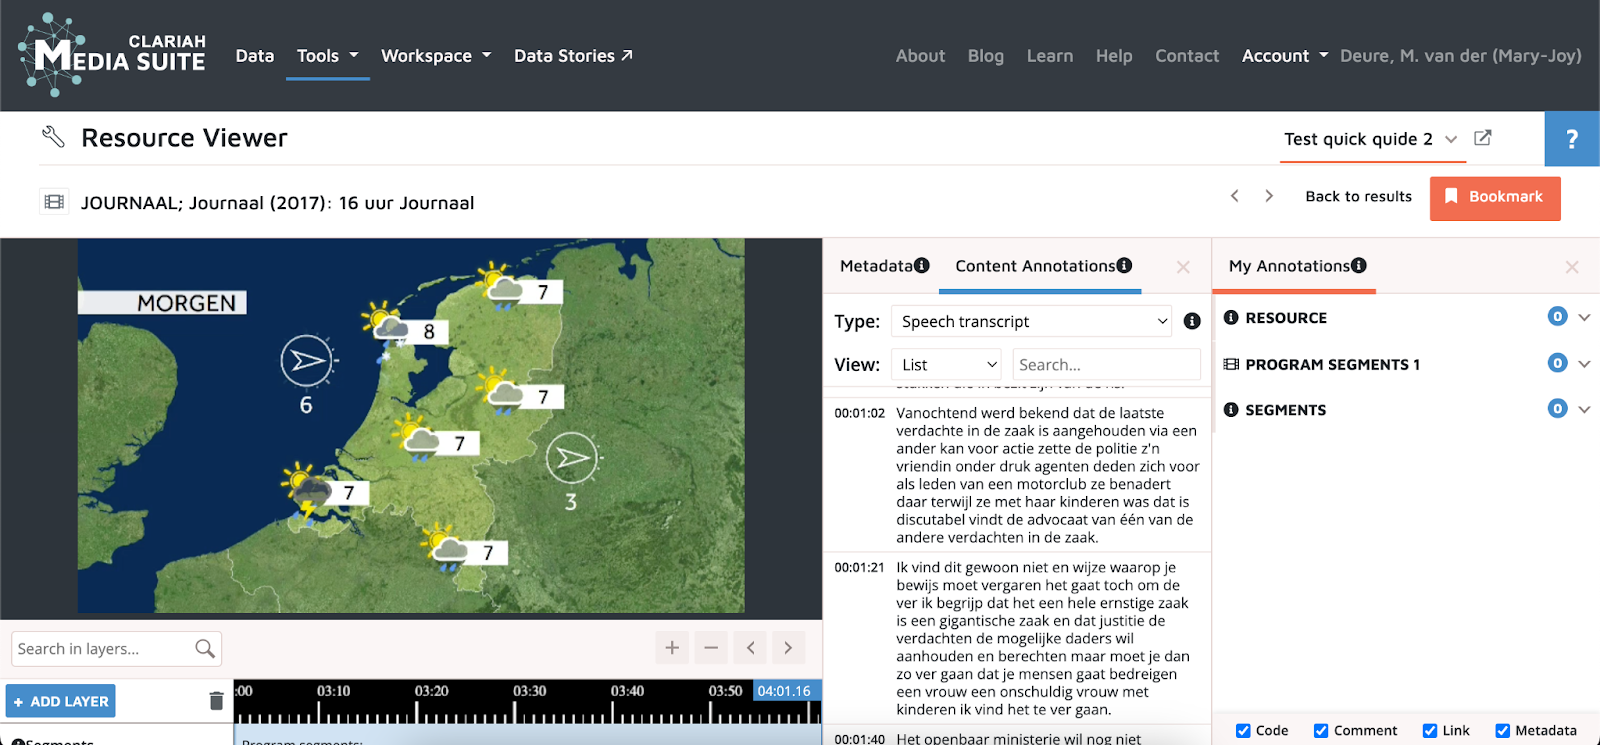
Figure 7. On the left side, you will find the video, with beneath it the timeline in which you can scroll and annotate. In the middle of the screen are the two tabs with the metadata and the content annotations, in this case open to the Automatic Speech Transcripts of this particular video. On the right is the ‘My annotation’ box in which all your segments and annotations will be visible.
Annotate It is also possible to add manual annotations to the object in the Resource Viewer. You can do this for the entire media object or only for selected segments. To add a new annotation, go to the timeline underneath the resource viewer. Here, you can add segments including different annotations. These annotations will eventually be visible in the ‘ My Annotations ’ panel on the right side of the screen. For an introduction on how to get started with annotating media items in the Media Suite, you may follow one of the case-based tutorials , available through Media Suite Learn .